These days, capturing memories with smartphones is almost effortless. You set up an angle, strike a pose, and your phone takes care of the rest. Aim, tap, focus – and bam! A great photo.
Drones need to be treated as separate players from smartphones or traditional cameras. They require a bit more time, prep, and control to capture a great shot. It’s not complex, it just requires a bit of practise – but the results are totally worth it! That said, there’s a tonne of overlap with photography like making the most of golden hour lighting and applying the rule of thirds.
I stand by the DJI Mini 2 as an exceptional and fairly priced drone for both beginners and experienced photographers. For one, it doesn’t overwhelm you with complex settings that hurt your brain when you’re just starting out. Secondly, the user-friendly controls and impressive 4K capabilities work together to deliver breathtaking aerial shots.
If you’re a non-photographer and are a complete newbie to photography, like me, then this guide is for you!
I started out as a total novice to both drone flying and photography. And I can honestly say I’ve learned so much about what goes about behind getting those Instagram shots by fiddling with settings. I’m a learner through trial and error! I’ve shot a lot of photos thinking it was a great idea at the time, only for them to look quite disappointing afterwards. Too much sun. Part of the view was cut off. All things you don’t want to see.
That said, here’s a quick disclaimer:
Photography is subjective. And not all settings work for everyone. Some people prefer to shoot in automatic mode over pro, and others may prefer to shoot in JPEG images without the need for RAW post-editing. These suggestions are aimed at enhancing your photo quality. As long as you make the adjustments that suit your preferences and style, I’m sure you’ll find the image results just as satisfying.
In this guide, we delve into various aspects of mastering DJI Mini 2 photography. From setting tweaks to artistic techniques, we’ll have you capturing the art of the skies in no time!
Lights, drone, action!
Learn How to Fly Your DJI Mini 2
Just like you can’t be a photographer without first picking up a camera and learning how to use it, you need to learn how to use your drone’s controls and features.
Drones are expensive pieces of equipment and it’s important you establish the basics of the controller before the gimbal lens. You’ll learn pretty quickly how much weather can affect your final shots (especially over water). I’ve tried my luck fighting the wind with my DJI Mini 2 only for my shots to look unstable and not as great as I first thought.
Winds can not only affect your drone in the air but also the gimbal lens. The DJI Fly app is great in that it notifies you of any strong wind currents or weather you’ll need to be aware of in flight. Pay attention to this as it may save disappointment later.
You should also familiarise yourself with the local laws and regulations. Different parks and lands could have their own set of rules, and they might have something to say about whether you can snap pictures there.
Capturing photos requires patience as you have to figure out the right angles to shoot from and which perspectives will showcase what you’re droning best. This will be a lot easier once you establish your foundations of flight control.
Check out common mistakes beginner drone pilots make.
Shoot Your Photos in RAW
When it comes to capturing your shots, RAW should be favoured over JPEG.
To understand why, we must first understand: what’s the difference between JPEG and RAW image files?
JPEG images are compressed, which means that some image data is removed to reduce file size. This tends to impact the displayed colours and the image quality. RAW files store unprocessed image data, giving you greater flexibility during post-processing. They hold on to much greater details and provide more accurate colours.
You might not notice the difference as much if you typically don’t edit your photos and prefer to share them in their natural state. However, if you do like to edit your shots in post-production (e.g. Adobe Lightroom), you want to give yourself as much flexibility as possible. So high quality is non-negotiable.
Think of RAW images like a blank canvas and JPEG images like a colouring book. When you start with a colouring book page (JPEG), the image is pre-drawn and the spaces to add colour are limited to the drawing.
Whereas, a blank canvas (RAW) gives you complete freedom. You can create your own lines, blend colours, and add details without any pre-existing boundaries. This extra flexibility is what makes RAW images more versatile for editing.
Drones such as the DJI Mini 2 can shoot photos in JPEG + RAW. This means that the image is saved in two versions: RAW and JPEG. This will show up as a DNG (double negative) file type – which is just a type of RAW format.
To shoot your DJI Mini 2 photos in RAW:
- Open up the DJI Fly app.
- Tap the three dots at the upper right corner of the screen which takes you to Settings.
- Click on the Camera tab.
- Under format, change JPEG to JPEG + RAW.
The overall file size will be bigger which can be a bit annoying, but shouldn’t be much of an issue if you have a micro SD card over 32GB. JPEGs are around 5-6 MB and RAW are 23MB.
Want to know the best micro SD card for your drone? Check out the top micro SD cards for drones.
Adjust the Sensor Cropping
By default, the DJI Mini 2 captures images with a 16:9 aspect ratio, resulting in an outcome usually seen on wide-screen televisions. You’ll see this when you dig into your ongoing Netflix show tonight.
The problem with 16:9 is that the overall image is automatically cropped which leaves less room for editing post-production. Imagine taking a shot of a church and you take a 16:9 shot, most likely the spire might be cut off. This cannot be restored in post-production as it was never recorded through the drone lens to begin with.
Recording in a 4:3 ratio allows the drone to take full advantage of its sensor and capture a large image. This leaves you more room to work with when it comes down to post-production, but also limits your chances of taking half a photo.
To enhance your photographic results, we recommend adjusting this ratio to 4:3, effectively making the most of the sensor size and elevating the overall image quality.
To change the sensor cropping of your DJI Mini 2 photos, follow these quick steps:
- Open up the DJI Fly app.
- Tap on GoFly to enter camera view.
- Tap the three dots at the upper right corner of the screen which takes you to Settings.
- Click on the Camera tab.
- Under aspect ratio, change from 16:9 to 4:3.
Avoid Automatic Mode
Automatic mode is a tricky one as some people prefer it and some people really don’t.
The key to getting better shots is to have more control over the settings behind it. While the automatic mode of the DJI Mini 2 can simplify the photography process, it can easily backfire if certain weather changes occur.
In automatic mode, nothing can be altered as you’re leaving it to the drone lens to determine the best exposure. This tends to fail on overcast and sunny days as you’ll notice overexposure.
By changing from Automatic to Pro mode, you’re able to manually alter the ISO and shutter speed. Meaning, there’s less chance of overexposure and noisy shots.
To change your camera settings from Auto to Pro on the DJI Mini 2:
- Open up the DJI Fly app.
- Tap on the camera icon at the bottom right of the screen.
- The camera icon will read Auto or Pro depending on the mode that you’re in.
Now, the good thing is you can fiddle these settings before you’re in the air. This works even better if you have a spare battery because time moves faster than you think. I like to spend a good few minutes before my shoot making sure my settings suit the current weather conditions. A few minutes of altering before your flight will make all the more difference in your final images.
To help explain this further, let’s look at ISO and shutter speed.
ISO is your drone len’s sensitivity to light – or how quickly the lens absorbs light. It typically ranges from 100 to 3200. The higher it is, the more light it lets in, and the brighter your image looks.
The shutter speed is the time it takes for light to hit your drone’s lens. This is measured in seconds, from 1 to 1/1000.
To double the amount of light, you need a longer shutter speed (closer to a second) as this will allow for more light and a longer exposure. So, moving from a shutter speed of 1⁄4 s to 1⁄2 will create a lighter image because the shutter will be open for twice as long.
On sunny days, an ISO set to 100 is pretty standard. However, on non-sunny days or late evenings, a higher ISO needs to be set to allow for more light. In doing so, a faster shutter speed can be used.
Generally, the lower the ISO, the better – as this means more crisp, detailed images with less noise. Natural light is always better light.
For night flying, try to keep the ISO between 100 and 200. Any higher may light up the image too much to the point it’s overexposed and doesn’t look very great. Also, increase the shutter speed to about 1 to 1.6 – depending on the wind.
Don’t Ignore Overexposure Warnings
Overexposure lines appear as cross hatches, more commonly known as zebra lines. By marking the areas that are overexposed, you can know which areas may come out too bright in your shot or turn down your ISO or shutter speed.
Overexposed photos can be harder to edit and darken than underexposed ones are to lighten up. This is a good feature to help you identify areas and avoid disappointment in post-editing.
To activate the overexposure warning on the DJI Mini 2:
- Open up the DJI Fly app while your drone and controller are connected.
- Tap on GoFly to enter camera view.
- Tap on the three dots in the top right corner of the screen.
- Tap on the Camera tab.
- Tap Overexposure Warning.
You will see this when you enable the exposure lines in the DJI Mini 2 settings.
By using overexposure warnings, you can start to take better photos with more balanced lighting.
Try AEB mode (HDR Images)
AEB mode – or auto exposure bracketing – is a quick and easy feature that allows you to capture shots in various exposures.
This is my go-to button for photo-snapping on my DJI Mini 2! By activating AEB mode, your drone will capture multiple shots of the same scene at three different exposure levels. This guarantees that at least one of the photos taken is going to have the right exposure you want.
It’s also helpful in situations where you may not want to spend too much time fiddling with the camera settings. You can just snap your shots and on to the next!
This method can also save you time in post-processing as you can merge the three images together and create a perfectly exposed and dynamic image.
To enable auto exposure bracketing images on your DJI Mini 2:
- Open up the DJI Fly app while your drone and controller are connected.
- Tap on the video icon on the right side of the screen and change this to a camera (photo mode)
- Tap on Quickshots.
- Tap AEB.
How To Take Vertical Shots with a DJI Mini 2
Even with all these great features put together – you can’t beat a great vertical photo. It’s ideal for social media posting and it’s the size of the majority of the photos on our phones.
First, it must be made clear that the DJI Mini 2 cannot take vertical shots. Unlike the DJI Mini 3 and Mini 3 Pro, the DJI Mini 2 cannot directly snap photos in vertical mode. I.e it doesn’t have this as a feature.
However, it can still be done!
What it requires is a bit more manual processes but the results work just as well!
What you need to do is point the gimbal slightly angled toward the ground and snap a shot. Then, move the gimbal upwards and meet the bottom of the picture from the top of the last picture.
This is easier to do when you imagine the background. Let’s look at this photo:

It has three sections. The foreground, midground and background, which is easily defined by the road. The foreground is the darker side where the road starts. The mid ground has the road and some light coloured fields. The background is the mountains and skyline.
Split your picture into three horizontal sections and snap three separate shots by only moving the gimbal.
Later, you can take your photos in Adobe Lightroom or which ever photo editing software you prefer. And you can combine these images to make a Panoroma Merge. You can then crop the photo and use the dimensions of 1080 x 1920 pixels or 16:9 aspect ratio.
A few things to consider with this method:
- Choose the right subject: Select subjects that would be captured best from a vertical perspective, such as tall structures, waterfalls, trees, or long stretches of road.
- Adjust the camera angle: Tilt the drone’s camera to emphasise the vertical lines and features of your subject.
- Don’t underestimate the foreground: Most people get caught up in the background, but including foreground elements up close can add depth and context to your shot.
- Use leading lines: Incorporate natural lines that guide the viewer’s eye vertically through the frame.
Find Your Aerial Perspective
Drones add a new perspective to your photos. An aerial perspective. Make sure this is what you’re trying to highlight in your photos. But you don’t need to be reaching for the highest (legal) altitudes to do so.
As a newbie to photography and drone flying, I used to believe flying higher was always better. But it can completely alter the focus point of the image.
Depending on your subject and the composition you’re aiming for, flying at a lower altitude can offer more personal and engaging viewpoints.
It might surprise you that you don’t necessarily need to ascend to great heights to capture certain shots. A majority of my photographs have been taken at altitudes below 80 metres. You wouldn’t expect it but a lot of aerial images are taken at heights lower than you think. This is because height is ambiguous and it’s hard to tell on photographs.
Instead, see what height would best showcase your scene sufficiently. Too low may not show the whole picture but too high could mean there’s no focus to the picture.
Remember not to overlook top-down photos. A bird’s eye view is unique for a reason. You can find some cool patterns, shapes or objects from above.
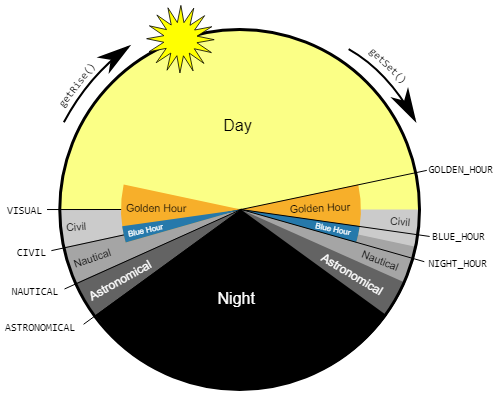
Shoot at Golden Hour
Golden Hour is used to describe roughly an hour after sunrise and an hour before sunset. Also known as the ‘magical hour’, it’s a term used amongst photographers – including that of aerial photography – that’s a golden opportunity for breath-taking golden shots.
It’s the point when the sun is lowest in the sky – casting warm red and orange blends across the sky. It adds a whole new character to your photos.
Shooting during the golden hours allows you to capture soft and warm lighting that enhances the beauty of your subjects. And let’s face it – everyone loves sunset shots!
The image below should help you gain a better understanding of when golden hour is likely to occur.
Try to plan your shoots at these times.
You can use apps such as Sunrise Sunset Times to track the exact times of sunrise and sunset each day.
Now, you may also see on the image that there’s a thing called Blue Hour. This is just before or just after the sun is visible. Therefore, before golden hour and just after sunset. These times can also create some gloomy but aesthetic atmospheres.
Finally, there’s night photography. This can be tricky depending on where you are in the world. For example, you can’t drone at night without a Part 107 Licence in the US. But in the case that you are legally allowed to fly at night, you will be able to capture some nice night atmospheres. Also, consider lights to help you track your drone more easily in the night sky.
Sunglasses for your Lens: ND Filters in DJI Mini 2 Photography
If you decide to drone outside of golden hours, you might want to think about using ND filters.
Neutral Density (ND) filters act as sunglasses for your drone’s lens and are designed to control light exposure in bright conditions.
ND filters simply allow you to do two things:
- Reduce your shutter speed
- Select a wider aperture
These filters are a key player in capturing the scene as naturally and as accurately as possible. All the original colours are kept, without sacrificing detail to overexposure or graininess.
Putting on the right filter for the right conditions also means they’ll be less fiddling through the camera settings. So if you’re one for minimal hassle, then give ND filters a thought!
These are some ND filters we recommend:
[Specifically made for the DJI Mini 2 and Mavic Mini. This set of six includes CPL, UV, PL filters. ND strengths include: ND8, ND16, ND32 and ND64.]
[ND/PL hybrid filters including ND strengths: ND8, ND16, ND32 and ND64. Suitable for DJI Mini 2 and Mavic Mini.]
[2 Pack of ND Filters including: ND1000 and ND2000. Perfect for capturing long exposure shots, maintaining smooth waters and motion blur.]
Neutral density filters differ in their levels of light-blocking power. They are generally measured in stops of light. Here’s a table to display the types of ND filters and when you should use them:
| ND Filter | F-Stop | When to use it |
| PL (Polariser) | 1.6 | Any condition to reduce glare |
| ND4 | 2 | Low lights, e.g. dawn or dusk |
| ND8 | 3 | Cloudy |
| ND16 | 4 | Partly cloudy or mostly sunny |
| ND32 | 5 | Bright and sunny |
| ND64 | 6 | Extremely bright conditions: snow, water or desert shots |
| ND1000/2000 | 10/11 | Long exposure shots, low flying. Smooth out water and clouds. |
Experiment with different ND filter strengths to capture motion blur and natural movements in your shots.
Include People In Your Photos
Introducing a human element into your aerial shots can provide a point of interest to the viewer – a sense of scale and narrative.
Whether it’s one person alone on a vast beach or a group of people in an urban setting, human subjects can add life to your shots. This technique adds a narrative and a sense of storytelling to your DJI Mini 2 photography.
Composition Tips
For you photographer-newbies out there, you’ll find quickly that composition is the heart of photography. Aerial photography abides by this also.
Composition is the way subjects come together in the frame to form the final image. Luckily, the DJI Mini 2 offers several composition aids within its automated features that help you capture shots more easily.
There’s no composition technique for every landscape. It’s a case of assessing the landscape and playing around with the composition aids to see which showcases the shot best.
To show composition aids on your DJI Mini 2:
- Open up the DJI Fly app while your drone and controller are connected.
- Tap on GoFly to enter camera view.
- Tap on the three dots in the top right corner of the screen.
- Tap on the Camera tab.
- In gridlines, select an image composition tool: rule of thirds, central cross, or diagonal lines.
DJI Mini 2 Composition Aids
Rule of Thirds
With the Rule of Thirds feature, the frame is divided into a 3×3 grid (or nine rectangles).
This feature is effective in that it can help you better position where certain subjects should be in the frame.
One way to use these lines is to use the intersection lines as your main focus points. Then, put something less eye-catching on the other side of the image. The result is a more well-balanced and interesting image. For example, when taking a shot of a coastal island, you can position the island to the side with the empty sea on the other side.
This way the image isn’t oversaturated with too much going on, and the image is more balanced and easy on the eyes.
Central Cross
For you gamers out there, the central cross is essentially your reticle or crosshairs.
It’s a white cross that will sit centre in your frame. It’s a feature to help you keep your subject in the centre of the frame. This cross helps best for moving subjects and even video footage.
Check out our best drone video tips.
Diagonal Lines
This feature will provide two white, diagonal lines – corner to corner – across your entire frame for easy focusing for the viewers.
I don’t tend to use this one much as it doesn’t provide much for me.
But it’s an option particularly for long roads or paths – helping you to plan depth and dynamics in your shot.
DJI Mini 2 Camera Modes
Panoramas
Panoramic shots can show a whole scene greater than the human eye can see. And that’s what makes them such a great aerial feature.
You’re already showing a new perspective from the skies, so why not show as much as you can?
360 Spheres
While hovering, your drone will take 26 images to cover a 360-degree angle. It will then merge these together to create a unique shot of the landscape.
Wide Angle
While the drone hovers, the gimbal will rotate around and capture 9 different angles of the landscape. I love to use this feature in Adobe Lightroom as you can automatically merge them and the final shots look insane.
180
A similar feature to the wide angle, however the drone stitches together 7 images instead of 9. It’ll look more like your traditional panoramic photos on your smartphone – more horizontally exposed.
To select panoramic shots on your DJI Mini 2:
- Open up the DJI Fly app.
- Tap on the video icon on the right side of the screen and change this to a camera (photo mode)
- Tap on Pano and select any of the modes: 360°, Wide, or 180°.
Edit Your Photos
Now we’ve covered all the things to improve your DJI Mini 2 photography on the drone itself, it’s time to take a look at the effects of editing on your final images.
Sometimes the perfect shot isn’t always possible first time. The blue water is not looking very blue. Or the sky is looking colourless.
Taking the time to edit and colour correct your photos can change a lifeless image into a vibrant photo.
This is the Adobe software we solely use to edit our high-resolution images. It’s easy to learn and great if you either want to edit a few touch-ups, or fully colour grade your shots.
Adobe Lightroom 12 Month Subscription
[Photo editing software with 1TB cloud storage, back-up, and sharing. Includes Lightroom Mobile on iOS and Android.]
Conclusion
By now, we should’ve covered everything to help you master your DJI Mini 2 photography.
From settings to the drone’s automated features, all the way to post-editing. There are tonnes of things to try with the DJI Mini 2. See the drone not as a point-and-click camera, but a tool that, with a few tweaks and knowledge, can take truly unique photos.
And all the learning will be truly rewarding when you see the outcomes of your newly taken shots.
Key Takeaways:
- Shoot in Pro mode, and avoid Automatic mode.
- Follow the 180 rule: the shutter speed should be double (or as close to double) the frame rate.
- Exposure warnings help identify overexposed areas in your shots.
- The DJI Mini 2 isn’t linear in its photo-taking skills. Experiment with panoramic, AEB shots or spheres!
- Don’t be afraid of taking too many shots. The more shots you take with little gimbal or drone adjustments, the easier you can figure out which shots you prefer.
Planning Your Shot
Successful DJI Mini 2 photography begins with thorough planning. Consider the following aspects when planning your aerial shots:
Use Apps
Apps are invaluable tools that can help you plan your drone journeys better. By using them and planning ahead, you can avoid any surprises or disappointment.
Here’s a few apps to help you out:
- Drone apps: DJI Fly and Drone Assist can help you avoid no-fly zones and takeoff troubles.
- Weather apps: Don’t get caught off guard by the weather. Apps like Met and Weather can keepy you updated hourly on any weather changes – especially rain!
- Scouting apps: Google Earth and Google Maps can help you scout for locations to safely drone. With Google Earth, you can scope out the lay of the land and structures in 3D, giving you a better idea of what shots and angles to capture. Furthermore, you can identify parking areas for easy accessibility.
Keep Batteries in Check
It’s easy to get caught up in fiddling with settings or chasing perfect shots – the battery can drain faster than you expect!
Charge your batteries a couple of hours before you fly. And if you’re feeling extra cautious, consider bagging some backups. That way, you won’t be at the mercy of just one battery.
FAQs: DJI Mini 2 Photography
Is the DJI Mini 2 good for photography?
Yes, the DJI Mini 2 is a popular and capable drone for photography, considering its compact size and affordable price.
What is the maximum flight time of the DJI Mini 2?
The DJI Mini 2 offers a maximum flight time of 31 minutes, under the condition of a fully charged battery.
Can I manually adjust the camera settings during flight?
Yes, you can manually adjust camera settings on the DJI app whilst in flight. Adjusting the ISO, shutter speed, and white balance will help you achieve the desired exposure effects.
Are there any legal restrictions for flying a DJI Mini 2?
Yes, drone flight regulations vary by country and region. Familiarise yourself with local and national laws to avoid any legal issues. As well as obtain any necessary licenses before flying your DJI Mini 2.
How do I ensure the safety of my DJI Mini 2 during flight?
Always perform pre-flight checks, fly in open areas away from people and obstacles, maintain a line of sight with the drone, and follow the manufacturer’s guidelines for safe operation.
Can I edit RAW images from the DJI Mini 2 on my mobile device?
Yes, there are mobile apps available that support editing RAW images from the DJI Mini 2. Adobe Lightroom, Snapseed, and Darkroom (iOS) offer a range of editing tools to enhance your photos.